UITableViewでラウンドロビン的な無限スクロールCoverFlowを作る
「UITableViewでCoverFlowを作れるか?」というネタに興味が湧いたのでちょっとやってみました。
UITableViewハック
ちなみに、iOSのCoverFlowについて調べてみると下記のようなframeworkが見つかりました。
- FlowCover (http://www.chaosinmotion.com/flowcover.html)
- iCarousel (https://github.com/nicklockwood/iCarousel)
- OpenFlow (http://apparentlogic.com/openflow/)
- Tapku (https://github.com/devinross/tapkulibrary)
ソースを覗くと、TapkuがUIScrollView、その他はUIViewでゴリゴリ作っているみたいです。
UITableViewで作る最大のメリットはCellの再利用機構にあり、UITableViewDataSourceとUITableViewDelegateをそのまま活用できます。今回、折角のUITableViewなので無限にスクロールできるラウンドロビン的なCoverFlowを試してみました。
結果、こんな感じのものができました。
色々と使えそうなテクニックもあると思いますので作り方を紹介します。
無限スクロールTableViewの作り方
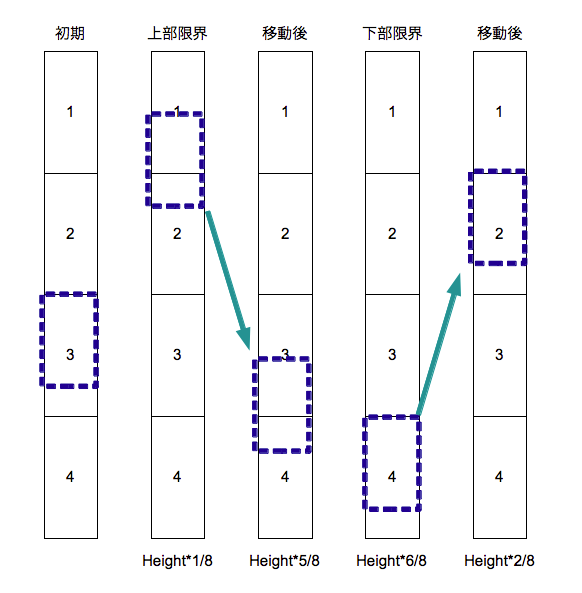
あらかじめ余分のDataSourceを用意し限界位置までスクロールされたらcontentOffsetを設定し直すという方法で行います。具体的にはDataSourceを4倍分のDataSourceを作成しscrollViewDidScroll:でcontentOffsetをチェックします。contentSize.heightの1/8に到達したら5/8に、6/8に到達したら2/8にcontentOffsetを設定しなおすという具合です。
- (void)scrollViewDidScroll:(UIScrollView *)scrollView {
    [self moveCenterOfContent:scrollView];
}

- (void)moveCenterOfContent:(UIScrollView *)scrollView {
    CGFloat currentOffsetX = scrollView.contentOffset.x;
    CGFloat currentOffSetY = scrollView.contentOffset.y;
    CGFloat contentHeight = scrollView.contentSize.height;

    if (currentOffSetY < contentHeight/8) {
        scrollView.contentOffset = CGPointMake(currentOffsetX, currentOffSetY + contentHeight/2);
    }
    if (currentOffSetY > contentHeight*6/8) {
        scrollView.contentOffset = CGPointMake(currentOffsetX, currentOffSetY - contentHeight/2);
    }
}
DataSourceがTableViewサイズより小さい場合(初期表示時にスクロールしない場合)は、初期処理でTableViewサイズを超えるまでDataSourceを等倍し、それを1セットとして4倍して作るようにします。
- (void)fillRecordsForView {
    CGFloat currentOffSetY = self.tableView.contentOffset.y;
    CGFloat contentHeight = self.tableView.contentSize.height;
    CGFloat viewHieght = self.tableView.bounds.size.height;

    if (currentOffSetY >= contentHeight - viewHieght) {
        [_records addObjectsFromArray:_records];
        [self.tableView reloadData];

        //画面サイズを超えるまで繰り返す
        [self fillRecordsForView];
    }
}
UIScrollViewDelegateを使っているのを見れば分かる通り、このテクニックはUIScrollViewで利用されるものです。
UITableViewのカスタマイズ
設計
カスタマイズしやすくするため、UITableViewControllerは使わずUIViewController.view上にUITableViewを配置し、UITableViewCellの上にUIImageViewを配置します。
それぞれのコンポーネントに役割を持たせたいのでUIKitを拡張してsubclass化します。
- CFCoverFlowViewController : UIViewController
- UITableViewDataSourceの管理
- ラウンドロビンスクロールの実装
- CFCoverFlowView : UITableView
- CoverFlowのデータ管理
- layoutSubviewsの実装
- CFCoverFlowCell : UITableViewCell
- TableView中央との距離の管理
- CellのCATransform3D処理
- スケール、位置、アングル、影の係数算出
- CFCoverFlowImageView : UIImageView
- 反射、影などのsublayerの管理
UITableViewのAffine変換
CFCoverFlowViewの初期化処理で左90度のCGAffineTransform変換をかけます。
CFCoverFlowView.m
- (id)initWithCoder:(NSCoder *)aDecoder {
    if ((self = [super initWithCoder:aDecoder])) {
        //左に90度回転
        CGAffineTransform t = CGAffineTransformMakeRotation(-M_PI/2.0f);
        self.transform = t;
    }
    return self;
}
UITableViewCellのCATransform3D処理
変形処理を開始するタイミングは CFCoverFlowViewController#scrollViewDidScroll (スクロール中) と
CFCoverFlowView#layoutSubviews: (初期表示時)に行います。
CFCoverFlowViewController.m
- (void)scrollViewDidScroll:(UIScrollView *)scrollView {
    [self moveCenterOfContent:scrollView];
    // 変換処理
    [(CFCoverFlowView *)scrollView transformView];
}
CFCoverFlowView.m
- (void)layoutSubviews {
    [super layoutSubviews];
    // 変換処理
    [self transformView];
}
変形対象のCellは現在表示されている部分だけに限定して、UITableView#indexPathsForVisibleRowsを使います。
尚、注意点としてUITableViewのCellは再利用されるため、tableView.subviewsはバラバラとなっており、そのまま変形すると遠近感が残念なことになってしまうので、予めソートして配置順を並び替える必要があります。
CFCoverFlowView.m
- (void)transformView {
    NSArray *sortedCells = [self sortedVisibleCellsByDistance];

    for (CFCoverFlowCell *cell in sortedCells) {
        //順番に背面から最前面に配置
        [self bringSubviewToFront:cell];
        //Cellの変形処理
        [cell transformCell];
    }
}

- (NSArray *)sortedVisibleCellsByDistance {
    NSMutableArray *sortedCells = [NSMutableArray array];

    NSArray *indexPaths = [self indexPathsForVisibleRows];
    for (NSIndexPath *indexPath in indexPaths) {
        CFCoverFlowCell *cell = (CFCoverFlowCell *)[self cellForRowAtIndexPath:indexPath];
        cell.distance = [self distanceFromCenter:indexPath];
        [sortedCells addObject:cell];
    }
    return [sortedCells sortedArrayUsingSelector:@selector(compare:)];
}

- (CGFloat)distanceFromCenter:(NSIndexPath *)indexPath {
    CGRect rect = [self rectForRowAtIndexPath:indexPath];
    CGFloat centerCellOffset = rect.origin.y+rect.size.height/2;
    CGFloat offset = self.contentOffset.y;
    CGFloat centerOffset = (self.bounds.size.height/2)+offset;
    return (centerCellOffset - centerOffset);
}
CFCoverFlowCell.m
- (NSComparisonResult)compare:(CFCoverFlowCell *)cell {
    if (fabs(self.distance) > fabs(cell.distance)) {
        return NSOrderedAscending;
    } else if (fabs(self.distance) < fabs(cell.distance)) {
        return NSOrderedDescending;
    } else {
        return NSOrderedSame;
    }
}
各Cellの変形処理
ここで視点Z座標の指定、右90度回転、角度調整、スケール調整、位置調整、影の透明度調整を行います。
尚、ここでもUITableViewのCellは再利用されるため、view.layer.positionを毎回初期化してあげる必要がります。
変形パラメータについて、画面の相対位置に対して変形係数を計算する処理を関数化しておくと色々と試したり複合的に使用する場合にメンテナンスがしやすくなります。
CFCoverFlowCell.m
- (void)transformCell {
    static const float zDistance = 800.0f;

    //CATransform3D前に毎回positionを設定し直す
    self.coverFlowImageView.layer.position = CGPointMake(self.frame.size.width/2, self.frame.size.height/2);

    float rate = [self rateOfDistance];

    CATransform3D t = CATransform3DIdentity;
    //視点の距離
    t.m34 = 1.0f / -zDistance;
    //右に90度回転
    t = CATransform3DRotate(t,
                            M_PI/2.0f,
                            0.0f,
                            0.0f,
                            1.0f);
    //角度
    t = CATransform3DRotate(t,
                            [CFCoverFlowCell angleForDistanceRate:rate],
                            0.0f,
                            1.0f,
                            0.0f);
    //スケール
    t = CATransform3DScale(t,
                           [CFCoverFlowCell scaleForDistanceRate:rate],
                           [CFCoverFlowCell scaleForDistanceRate:rate],
                           [CFCoverFlowCell scaleForDistanceRate:rate]);
    //位置
    t = CATransform3DTranslate(t,
                               [CFCoverFlowCell translateForDistanceRate:rate],
                               0.0f,
                               0.0f);
    self.coverFlowImageView.layer.transform = t;

    //影の透明度
    self.coverFlowImageView.shadowLayer.opacity = [CFCoverFlowCell shadowOpacityForDistanceRate:rate];
}
UITableViewの中央を0、左端を-1、右端を1としてUITableView中央からCell中央までの距離を相対値で算出します。
CFCoverFlowCell.m
- (float)rateOfDistance {
    return (float)(self.distance * 2.0f / self.frame.size.width);
}
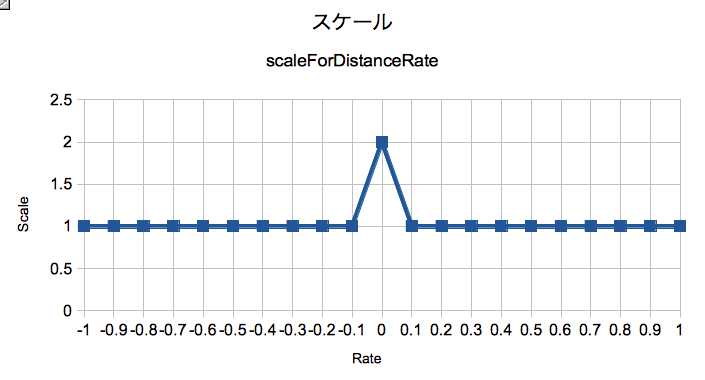
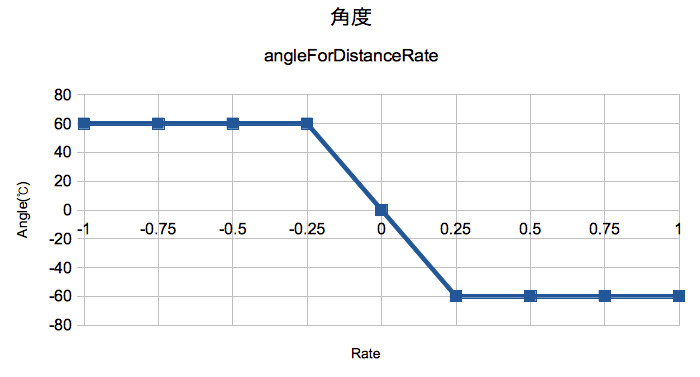
CoverFlowの動作を想像しながら、それぞれの変形係数について相対値に対した出力値をグラフ化しておきます。特に理由がない限り連続な線になるようにしてください。
最初は複雑な曲線は描かず、単純な区分線形関数で表せる程度のものにして挙動を確認しながら複雑な非線形曲線に調整していくとよいと思います。
グラフを元にそれぞれの関数の計算式を組みます。
CFCoverFlowCell.m
+ (float)scaleForDistanceRate:(float)rate {
    static const float coefficient = 10.0f;
    static const float maxScale = 2.0f;
    static const float minScale = 1.0f;

    if (fabsf(rate) > 0.1f) {
        return minScale;
    }
    return - (coefficient * fabs(rate)) + maxScale;
}

+ (float)angleForDistanceRate:(float)rate {
    static const float coefficient = 4.0f;
    static const float baseAngle = - M_PI/3.0f; //60 degree

    if (fabsf(rate) > 0.25f) {
        return copysignf(1.0f, rate) * baseAngle;
    }
    return coefficient * rate * baseAngle;
}

+ (float)translateForDistanceRate:(float)rate {
    static const float coefficient = 200.0f;

    if (fabs(rate) < 0.25f) {
        return coefficient * rate;
    }
    return - (coefficient * rate) + (copysignf(1.0f, rate) * coefficient/2.0f);
}

+ (float)shadowOpacityForDistanceRate:(float)rate {
    static const float coefficient = 1.0f;

    if (fabs(rate) < 0.1f) {
        return 0.0f;
    }
    return coefficient * fabsf(rate) - (coefficient * 0.1f);
}
ImaveViewのエフェクト
init処理にて反射のlayer、反射の影のlayer、ImageView・反射layerに対する相対値に応じた影のlayerを配置する。それぞれのframeは可変なのでframeの設定はlayoutSublayersOfLayer:で行います。
尚、ここでもUITableViewCell再利用のために反射のlayerにゴミが残ってしまうので反射layerのcontents設定はImageView本体のsetImageをオーバーライドしてこのタイミングで設定するようにします。
CFCoverFlowImageView.m
- (id)initWithCoder:(NSCoder *)aDecoder {
    if ((self = [super initWithCoder:aDecoder])) {
        [self addLayer];
    }
    return self;
}

- (void)addLayer {
    static float const reflectionShadowOpacity = 0.7f;

    _shadowLayer = [CALayer layer];
    _shadowLayer.backgroundColor = [[UIColor blackColor] CGColor];
     _shadowLayer.masksToBounds = YES;
    _shadowLayer.opacity = 1.0f;

    _reflectionLayer = [CALayer layer];
     _reflectionLayer.masksToBounds = YES;
    _reflectionLayer.opacity = 1.0f;

    _reflectionLayer.transform = CATransform3DMakeScale(1.0f, -1.0f, 1.0f);
    _reflectionLayer.contentsGravity = kCAGravityResize;
    _reflectionLayer.sublayerTransform = _reflectionLayer.transform;

    _reflectionShadowLayer = [CALayer layer];
    _reflectionShadowLayer.backgroundColor = [[UIColor blackColor] CGColor];
     _reflectionShadowLayer.masksToBounds = YES;
    _reflectionShadowLayer.opacity = reflectionShadowOpacity;

    [_reflectionLayer addSublayer:_reflectionShadowLayer];
    [self.layer addSublayer:_reflectionLayer];
    [self.layer addSublayer:_shadowLayer];
}

- (void)layoutSublayersOfLayer:(CALayer *)layer {
    static float const space = 3.0f;

    CGRect shadowRect = layer.bounds;
    shadowRect.size.height = (layer.bounds.size.height * 2) + space;
    _shadowLayer.frame = shadowRect;

    CGRect reflectionRect = layer.bounds;
    reflectionRect.origin.y = layer.bounds.size.height + space;
    _reflectionLayer.frame = reflectionRect;

    _reflectionShadowLayer.frame = layer.bounds;

    [super layoutSublayersOfLayer:layer];
}


- (void)setImage:(UIImage *)image {
    [super setImage:image];
    _reflectionLayer.contents = self.layer.contents;
}
スクロール停止時の調整処理
スクロール停止時に中央に近いCellをTableView中央にフィットさせます。ハンドリングはドラッグ停止 (scrollViewDidEndDragging:)とスクロール慣性停止 (scrollViewDidEndDecelerating:)で行います。
CFCoverFlowViewController.m
- (void)scrollViewDidEndDragging:(UIScrollView *)scrollView willDecelerate:(BOOL)decelerate {
    if(!decelerate) {
        [(CFCoverFlowView *)scrollView fitCenterForCell];
    }
}

- (void)scrollViewDidEndDecelerating:(UIScrollView *)scrollView {
    [(CFCoverFlowView *)scrollView fitCenterForCell];
}
CFCoverFlowView.m
- (void)fitCenterForCell {
    NSArray *sortedCells = [self sortedVisibleCellsByDistance];
    if (sortedCells.count > 0) {
        CFCoverFlowCell *cell = [sortedCells lastObject];
        [self setContentOffset:CGPointMake(self.contentOffset.x, self.contentOffset.y+cell.distance) animated:YES];
    }
}
その他の調整
CoverFlowはcontentの起点がTableView中央に位置するため、初期表示時とデバイス回転時に調整が必要です。
初期表示時のcontentOffsetはtableView.contentSize.heightを元に計算しますが、DataSourceを作成、tableView#reloadDataの実行後である必要があります。考えてみれば当たり前なんですが暫く悩みました。
デバイス回転をサポートしている場合は回転時にcontentOffsetの調整が必要になります。いくつか方法があるとは思いますがサンプルコードではデバイスサイズの縦横長の差分の半分を調整しています。
まとめ
UITableViewのCellは再利用されるため、Cellの値の初期化やsubviewの順番やガベージデータ、frame設定のタイミングなどで、いくつかの注意点が必要ですがそれさえ気をつければかなり楽に作ることができます。
この方法を使えば、CoverFlowだけでなく面白いエフェクトが作れそうな気がします。
カスタマイズのポイントとしては
- UITableViewを左90度回転
- Cellのlayerに対してCATransform3D変形をかける
- 右90度回転
- スケール、位置、アングル、影、反射など
- TableViewに対するCellの相対位置を計測し、変形係数を算出
- 変形タイミングはスクロール時、TableView初期表示時に行う
- 各CellのViewの重なり順の並び替え
- TableViewの中央に遠い順にソートしCellを重ね合わせる(bringSubviewToFront:)
- スクロール停止時に近いCellを中央にフィットさせる
- 初期表示時のcontentOffsetの調整
- デバイス向き変更時のcontentOffsetの調整
サーバから自由にカスタマイズ可能なメニューを実装する
メニューの項目や階層構造をアプリのリリース後に自由に変更できるようにしたいことがあります。
基幹系アプリの場合によくある理由として
- 常時通信環境で運用するわけではない
- 運用してみないとよりよいメニュー構造がわからない
- iOS技術者ではない運用者がメニュー階層を簡単に弄りたい
- WebViewでは野暮ったい などなど
確かにメニュー階層はアプリ使い勝手を左右する重要な部分なのでよく納得できる内容です。
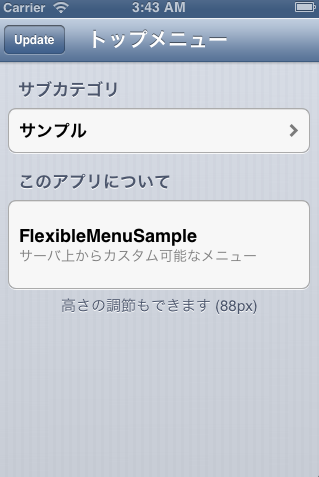
今回、メニュー構成(plist)をWeb上に配置して自由にカスタマイズできるような実装を行なってみました。要件としては下記のような感じです。
- UITableViewのメニュー情報は全て外部リソース(Menu.plist)に保持する
- 初回は通信からメニュー情報を読込キャッシュして、次回移行はキャッシュから読み込む
- メニューの情報は手動で通信してアップデートする
若干変態的なのですがメニューはUITableViewを動的な作りにして実装します。
Menu.plistの構造
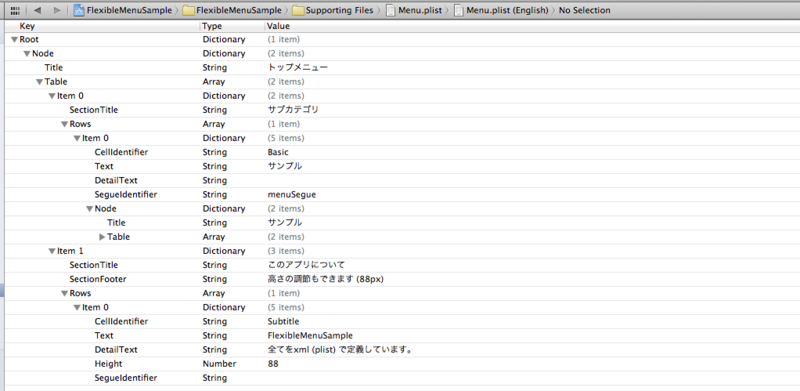
メニューを構成する必要な情報は全てMenu.plistに保持するように定義します。
- Root (Dictionary)
- Node (Dictionary) ※ルート画面の情報
- Title (String) ※タイトルバー
- Table (Array)
- Item (Dictionary) ※1セクションの情報
- SectionTitle (String) ※セクションの表示文字
- SectionFooter (String) ※フッターの表示文字
- Rows (Array)
- Item (Dictionary) ※1セルの情報
- CellIdentifier (String) ※セルのID、CellのStyleを定義
- Text (String) ※セルの表示文字
- DetailText (String) ※セル詳細の表示文字
- Height (Number) ※セルの高さ
- SegueIdentifier (String) ※セル選択時の起動SegueID、遷移先を定義
- Node (Dictionary) ※次画面の情報 (以下繰返)
- Item (Dictionary) ※1セルの情報
- Item (Dictionary) ※1セクションの情報
- Node (Dictionary) ※ルート画面の情報
メニューアップデート時の通信を1トランザクションで終わらせるために遷移先の画面情報もMenu.plistの1ファイルで保持するようにしました。
Storyboardの定義
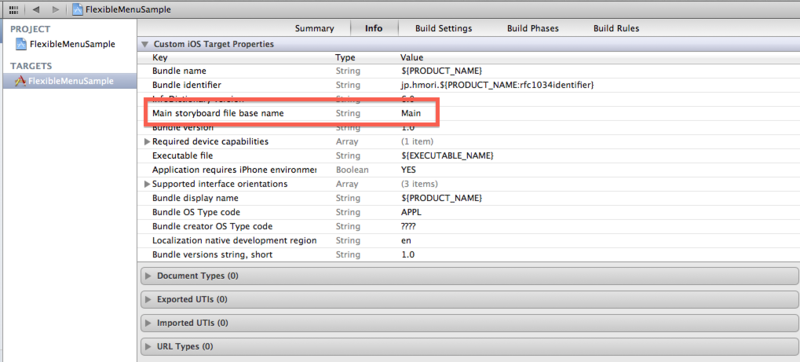
ここではStoryboardの名前をMain (Main.storyboard)とします。起動時のInfo.plistのstoryboard名をMainに定義します。
この際、AppDelegateのdidFinishLaunchingWithOptionsではwindowの初期化を行わないようにします。
AppDelegate.m
- (BOOL)application:(UIApplication *)application didFinishLaunchingWithOptions:(NSDictionary *)launchOptions {
    return YES;
}
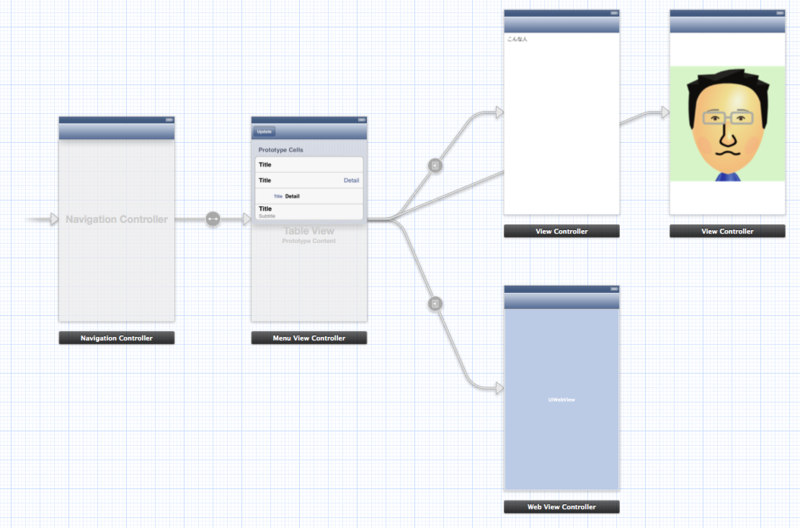
MenuViewContollerと遷移されるLeaf(葉)となるViewContollerを全て定義し、LeafへのSegueはmanual定義するようにしておきます。
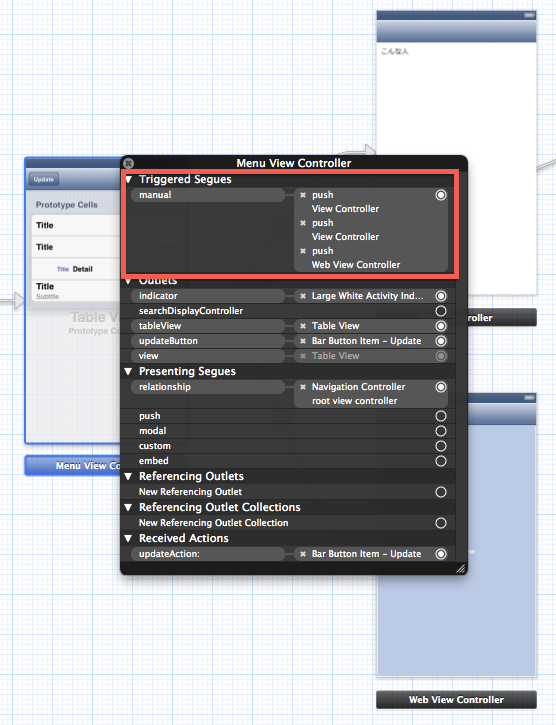
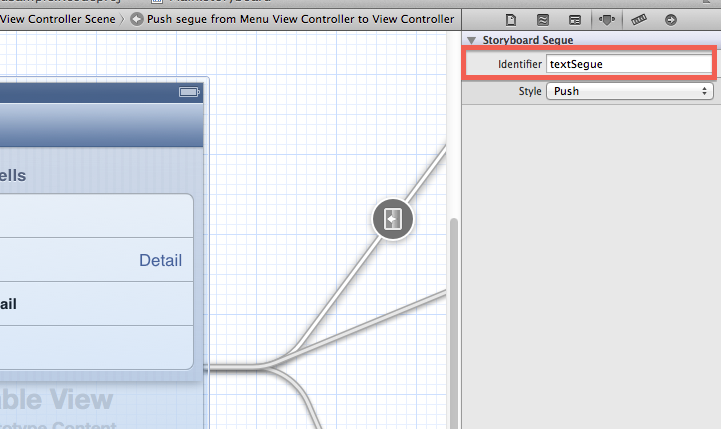
Segueのmanual定義は、MenuViewControllerのバー部分を右クリックしてTriggered Segueのmanualから引っ張ります。またSegueを起動するためIDを振っておきます。
manual定義した場合、条件によりUIViewController#performSegueWithIdentifier:sender: で分岐させることが可能となります。
MenuViewControllerにUITableViewCellをStyle分用意してそれぞれIDを振ります。(Basic、RightDetail、LeftDetail、Subtitle)
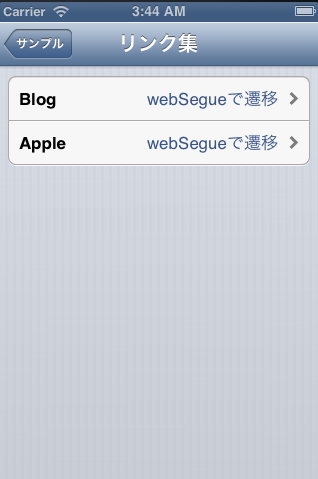
Segueは遷移処理(アニメーション等)を定義するものですが、遷移先(Leaf)に対して1本用意してIDによりSegueを呼び出すようにします。多段階層メニューなのでMenuViewControllerをループさせるmanual定義はStoryboardから行えないので、ソース内で手動で処理します。
MenuViewControllerのTableViewの実装
Node(1画面の表示情報)をNSDictionaryで保持し、各UITableViewのDataSource、Delegateを実装します。
FMMenuViewController.h
@interface FMMenuViewController : UITableViewController {
    NSDictionary *_node;
}
@property (strong, nonatomic) NSDictionary *node;
@end
FMMenuViewController.m DataSource
- (NSInteger)numberOfSectionsInTableView:(UITableView *)tableView {
    return [[self tables] count];
}

- (NSString *)tableView:(UITableView *)tableView titleForHeaderInSection:(NSInteger)section {
    return [[self sectionItem:section] objectForKey:kSectionTitle];
}

- (NSString *)tableView:(UITableView *)tableView titleForFooterInSection:(NSInteger)section {
    return [[self sectionItem:section] objectForKey:kSectionFooter];
}

- (NSInteger)tableView:(UITableView *)tableView numberOfRowsInSection:(NSInteger)section {
    return [[self rows:section] count];
}

- (CGFloat)tableView:(UITableView *)tableView heightForRowAtIndexPath:(NSIndexPath *)indexPath {
    CGFloat height = [[[self rowItem:indexPath] objectForKey:kHeight] floatValue];
    if (height <= 0) {
        return 44.0f; //default height
    }
    return height;
}

- (UITableViewCell *)tableView:(UITableView *)tableView cellForRowAtIndexPath:(NSIndexPath *)indexPath {
    NSDictionary *rowItem = [self rowItem:indexPath];
    NSString *cellIdentifier = [rowItem objectForKey:kCellIdentifier];
    UITableViewCell *cell = [tableView dequeueReusableCellWithIdentifier:cellIdentifier];

    cell.textLabel.text = [rowItem objectForKey:kText];
    cell.detailTextLabel.text = [rowItem objectForKey:kDetailText];

    NSString *segueIdentifier = [rowItem objectForKey:kSegueIdentifier];
    if (segueIdentifier.length > 0) {
        cell.accessoryType = UITableViewCellAccessoryDisclosureIndicator;
    } else {
        cell.accessoryType = UITableViewCellAccessoryNone;
    }
    return cell;
}

#pragma mark - Private methods
- (NSArray *)tables {
    return [_node objectForKey:kTable];
}

- (NSDictionary *)sectionItem:(NSInteger)section {
    return [[self tables] objectAtIndex:section];
}

- (NSArray *)rows:(NSInteger)section {
    return [[[self tables] objectAtIndex:section] objectForKey:kRows];
}

- (NSDictionary *)rowItem:(NSIndexPath *)indexPath {
    return [[self rows:indexPath.section] objectAtIndex:indexPath.row];
}
特定のCell情報、Rows->ItemにsegueIdentifierが定義されていない場合は、アクセサリにDisclosure Indicator (青の右矢印)をつけないようにしています。
FMMenuViewController.m Delegate
- (void)tableView:(UITableView *)tableView didSelectRowAtIndexPath:(NSIndexPath *)indexPath {
    NSDictionary *rowItem = [self rowItem:indexPath];
    NSString *segueIdentifier = [rowItem objectForKey:kSegueIdentifier];

    if (segueIdentifier.length > 0) {
        if ([segueIdentifier isEqualToString:kMenuSegue]) {
            UIStoryboard *storyboard = [UIStoryboard storyboardWithName:kStoryboardIdentifier bundle:nil];
            FMMenuViewController *ctl = [storyboard instantiateViewControllerWithIdentifier:kMenuControllerIdentifier];
            ctl.node = [rowItem objectForKey:kNode];
            [self.navigationController pushViewController:ctl animated:YES];
        } else {
            @try {
                [self performSegueWithIdentifier:segueIdentifier sender:rowItem];
            }
            @catch (NSException *exception) {
                NSLog(@"NSException : performSegueWithIdentifier : %@", exception);
            }
        }
    }
    [tableView deselectRowAtIndexPath:indexPath animated:YES];
}
前述で書いた通り、manualの再帰的なSegueはStoryboardで定義できないので、手動でnavigationControllerにpushします。具体的にSegueIdentifierが"menuSegue"の場合にStoryboardからFMMenuViewControllerをインスタンス化し、次画面用のNode情報を設定してpushします。
            UIStoryboard *storyboard = [UIStoryboard storyboardWithName:@"Main" bundle:nil];
            FMMenuViewController *ctl = [storyboard instantiateViewControllerWithIdentifier:@"menu"];
            ctl.node = [rowItem objectForKey:kNode];
            [self.navigationController pushViewController:ctl animated:YES];
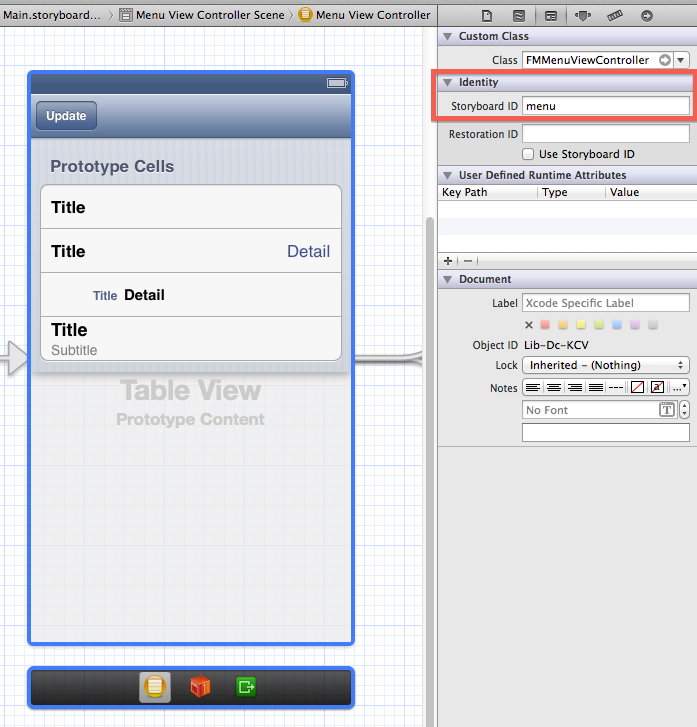
この際、FMMenuViewControllerのStoryboard IDが必要になるので、StoryboardでIDを"menu"と振っておきます。
対象のセルを選択時、Menu.plistのSegueIdentifierで定義したIDを読込んでStoryboardのLeafのSegueを呼び出します。
この時にSegueIdentifierがStoryboard上に存在しない場合、例外が発生しますのでcatchするようにします。
            @try {
                [self performSegueWithIdentifier:segueIdentifier sender:rowItem];
            }
            @catch (NSException *exception) {
                NSLog(@"NSException : performSegueWithIdentifier : %@", exception);
            }
UIViewController#prepareForSegue:sender: は performSegueWithIdentifier:でSegueが起動する直前に呼び出されます。prepareForSegueではLeafへのパラメータを渡しの処理を記述します。prepareForSegueのsenderはperformSegueWithIdentifier:発行時のsenderが渡されます。ここではrowItemが渡されます。
- (void)prepareForSegue:(UIStoryboardSegue *)segue sender:(id)sender {
    FMViewController *viewController = segue.destinationViewController;
    [viewController setNode:[sender objectForKey:kNode]];
}
FMViewController.h
@interface FMViewController : UIViewController {
    NSDictionary *_node;
}
@property (strong, nonatomic) NSDictionary *node;
@end
FMViewController.m
@implementation FMViewController
@synthesize node = _node;

- (void)viewDidLoad {
    [super viewDidLoad];
    if (self.node) {
        self.title = [self.node objectForKey:kTitle];
    }
}
FMViewControllerのような全Leafの基底クラスを準備しすると、FMMenuViewControllerと各LeafのControllerは疎結合とすることができます。
Menu.plistの読込処理
FMMenuViewControllerのnodeがnilの場合は現画面がルートメニューであると判断します。viewDidLoadでローカルのDocumentディレクトリにMenu.plistが存在するかチェックし、存在すればNSDictionary#dictionaryWithContentsOfFile: で読み込みます。
    NSString *docPath = [NSSearchPathForDirectoriesInDomains(NSDocumentDirectory, NSUserDomainMask, YES) lastObject];
    NSString *filepath = [docPath stringByAppendingPathComponent:@"Menu.plist"]
    if ([[NSFileManagerdefaultManager] fileExistsAtPath:filepath]) {
        //load local file
        self.node = [[NSDictionarydictionaryWithContentsOfFile:filepath] objectForKey:kNode];
    }
Menu.plistが存在しなければサーバにリクエストを発行します。NSDictionary#dictionaryWithContentsOfURL:でも簡単に読込できるのですが、このメソッドは同期処理であることとタイムアウトが検知できないため避けるべきだと思います。(※通信中はフリーズしてしまう)
iOS5からNSURLConnection#sendAsynchronousRequest:queue:completionHandler:という簡単に非同期処理が行えますのでこちらを使います。Menu.plistのパースにはiOS5から標準で追加されたNSJSONSerializationが便利そうなのでこちらを利用します。
- (void)requestData {

    NSURL *url = [NSURL URLWithString:kRequestUrl];
    NSURLRequest *request = [NSURLRequest requestWithURL:url
                                             cachePolicy:NSURLRequestReloadIgnoringLocalCacheData
                                         timeoutInterval:10.0f]; //timeout 10 seconds

    //indicator start
    [self.indicator startAnimating];

    __block FMMenuViewController *weakSelf = self;
    [NSURLConnection
     sendAsynchronousRequest:request
     queue:[[NSOperationQueue alloc] init]
     completionHandler:^(NSURLResponse *response, NSData *data, NSError *error) {
         //indicator stop
         [weakSelf.indicator performSelectorOnMainThread:@selector(stopAnimating)
                                              withObject:nil
                                           waitUntilDone:YES];
         if (!error) {
             //parse JSON format
             NSDictionary *root = [NSJSONSerialization JSONObjectWithData:data
                                                                  options:NSJSONReadingAllowFragments
                                                                    error:nil];
             //write local file
             [root writeToFile:[weakSelf documentFilepath] atomically:YES];

             weakSelf.node = [root objectForKey:kNode];
             [weakSelf performSelectorOnMainThread:@selector(refreshData:)
                                        withObject:nil
                                     waitUntilDone:YES];
         }
     }];
}

- (void)refreshData:(id)sender {
    self.title = [_node objectForKey:kTitle];
    [self.tableView reloadData];
}
読み込んだパース済みのrootはNSDictorary#writeToFile:atomicallyで次回用にローカルファイルに書き込みます。
completionHandler:ブロックは応答があった時の処理ですが、ここは非同期スレッドで動作するのでUI処理はメインスレッドに同期させるようにします。また、循環参照リークを引き起こす可能性があるのでブロック内部から外部の変数へ直接アクセスしないように注意します。
Xcodeで作成したplistはxmlフォーマットなのですが、MacOSにはplutilコマンドが用意されており、xml <-> jsonの変換は可能です。
http://azu.github.com/2012/09/18/plist-to-json-to-objective-c-literal/
Menu.plistをMenu.jsonに変換
$ plutil -convert json -o Menu.json Menu.plist
XMLReader
参考までに、JSONじゃなくてXMLをそのまま扱いたい場合は、サードパーティライブラリでXMLReaderというものが便利に使えそうです。MIT Licenseで提供されています。(※著作権表示および許諾表示義務のみ)
https://github.com/Insert-Witty-Name/XML-to-NSDictionary
参考)http://www.zero4racer.com/blog/371
サンプルコード
サンプルコードをgithubにアップしました。
https://github.com/hmori/FlexibleMenuSample
このサンプルコードはソース上に固有の情報を持たないシンプルな作りになっています。梱包されているMenu.plistは構造のサンプルで、実際にはソース上から参照していません。動作するMenu.plistはFMMenuViewController.mのkRequestUrlのjsonファイルになります。
この方法を使えばAppStore審査通過後に隠し機能を有効にするというイースターエッグが埋め込めますが、ディベロッパー規約違反になりますのでご注意を。
iOS6のSocial.frameworkを試してみた
iOS6からFacebook、微博(Weibo)、Twitterを統合したSocial.frameworkが追加されました。例によってAOuth認証などの面倒な手続きは全てiOS側で行なってくれるので投稿だけであれば、数行のコードで実装が可能です。
iOS5から追加されたTwitter.frameworkは廃止の方向になるので、新しく実装する場合はSocial.frameworkで実装した方がよさそうです。実装方法はTwitter.frameworkと同じような作りとなっているので簡単に移行できると思います。
SLComposeViewControllerでの投稿方法
プロジェクトのBuild PhasesのLink Binary with Librariesで「Social.framework」を追加します。
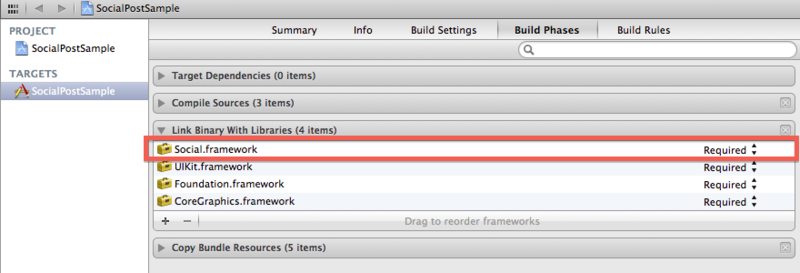
ヘッダにSocial.hをインポートします。
#import <Social/Social.h>
投稿するアクションにてSLComposeViewControllerを作成し、presentViewController で呼び出します。
    if ([SLComposeViewController isAvailableForServiceType:SLServiceTypeTwitter]) { //利用可能チェック
        NSString *serviceType = SLServiceTypeTwitter;
        SLComposeViewController *composeCtl = [SLComposeViewController composeViewControllerForServiceType:serviceType];
        [composeCtl setCompletionHandler:^(SLComposeViewControllerResult result) {
            if (result == SLComposeViewControllerResultDone) {
                //投稿成功時の処理
            }
        }];
        [self presentViewController:composeCtl animated:YES completion:nil];
    }
serviceTypeはSLServiceTypeTwitter、SLServiceTypeFacebook、SLServiceTypeSinaWeiboが用意されており、それぞれに投稿画面が用意されています。
標準の投稿画面を使用せずにカスタムビュー等で直接投稿する方法
SLRequestを使用することでSLComposeViewControllerを使わずに直接それぞれのWebAPIを叩くことができます。ACAccountStoreでiOSのアカウント認証情報がラップされておりOAuth認証周りをSLRequestが吸収してくれるのでWebAPIのみに専念できます。
プロジェクトのBuild PhasesのLink Binary with Librariesで「Accounts.framework」を追加します。

ヘッダにAccounts.hをインポートします。
#import <Accounts/Accounts.h>
Twitterの場合
投稿だけならTwitterの開発者登録(appkey等)は不要です。iOSのアカウント認証ACAccountが全て上手くやってくれます。
    if ([SLComposeViewController isAvailableForServiceType:SLServiceTypeTwitter]) {
        ACAccountStore *accountStore = [[ACAccountStore alloc] init];
        ACAccountType *accountType = [accountStore accountTypeWithAccountTypeIdentifier:ACAccountTypeIdentifierTwitter];
        [accountStore
         requestAccessToAccountsWithType:accountType
         options:nil
         completion:^(BOOL granted, NSError *error) {
             if (granted) {
                 NSArray *accountArray = [accountStore accountsWithAccountType:accountType];
                 if (accountArray.count > 0) {
                     NSURL *url = [NSURL URLWithString:@"http://api.twitter.com/1/statuses/update.json"];
                     NSDictionary *params = [NSDictionary dictionaryWithObject:@"SLRequest post test." forKey:@"status"];

                     SLRequest *request = [SLRequest requestForServiceType:SLServiceTypeTwitter
                                                             requestMethod:SLRequestMethodPOST
                                                                       URL:url
                                                                parameters:params];
                     [request setAccount:[accountArray objectAtIndex:0]];
                     [request performRequestWithHandler:^(NSData *responseData, NSHTTPURLResponse *urlResponse, NSError *error) {
                         NSLog(@"responseData=%@", [[NSString alloc] initWithData:responseData encoding:NSUTF8StringEncoding]);
                     }];
                 }
             }
         }];
    }
この例では、iOS内で認証した複数アカウントが存在した場合は1件目で投稿していますが、ACAccount#identifierを保持しておいて、 ACAccountStore#accountWithIdentifier: でACAccountを取得するようにします。
また、iOS5から追加されたACAccountStore#requestAccessToAccountsWithType:withCompletionHandler:handler:はDEPRECATEDとなっているので、ACAccountStore#requestAccessToAccountsWithType:options:completion:を使うようにします。Twitterの場合はoptionsはnilで構いません。
TwitterのREST APIドキュメントはこちら ⇨ https://dev.twitter.com/docs/api/1.1/post/statuses/update
Weiboの場合
WeiboもほとんどTwitterと同様で、WeiboAPIのversion2であればappkeyは不要のようです。尚、Weiboのアカウント認証設定を出すためには中国語用のキーボードを追加すればiOSの設定画面でWeiboが出現します。
    if ([SLComposeViewController isAvailableForServiceType:SLServiceTypeSinaWeibo]) {
        ACAccountStore *accountStore = [[ACAccountStore alloc] init];
        ACAccountType *accountType = [accountStore accountTypeWithAccountTypeIdentifier:ACAccountTypeIdentifierSinaWeibo];
        [accountStore
         requestAccessToAccountsWithType:accountType
         options:nil
         completion:^(BOOL granted, NSError *error) {
             if (granted) {
                 NSArray *accountArray = [accountStore accountsWithAccountType:accountType];
                 if (accountArray.count > 0) {
                     NSURL *url = [NSURL URLWithString:@"https://api.weibo.com/2/statuses/update.json"];
                     NSDictionary *params = [NSDictionary dictionaryWithObject:@"SLRequest post test." forKey:@"status"];
                     SLRequest *request = [SLRequest requestForServiceType:SLServiceTypeSinaWeibo
                                                             requestMethod:SLRequestMethodPOST
                                                                       URL:url
                                                                parameters:params];
                     [request setAccount:[accountArray objectAtIndex:0]];
                     [request performRequestWithHandler:^(NSData *responseData, NSHTTPURLResponse *urlResponse, NSError *error) {
                         NSLog(@"responseData=%@", [[NSString alloc] initWithData:responseData encoding:NSUTF8StringEncoding]);
                     }];
                 }
             }
         }];
    }
WeiboのWebAPIドキュメントはこちら ⇨ http://open.t.sina.com.cn/wiki/2/statuses/update
Facebookの場合
ACAccountStoreでアカウントにアクセスする際に、Facebookアプリ登録といくつかの設定が必要となります。
FacebookAPI (iOS SDK)を拡張するで書いたようにFacebookアプリを登録します。ソースに埋め込むApp IDは基本設定のところに表示されます。
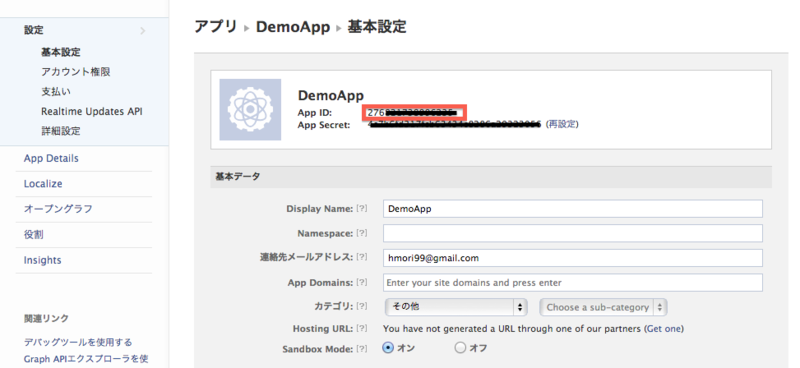
基本設定タブの「アプリをFacebookに結合する方法を選択」でネイティブiOSアプリを選択し、開発しているiOSアプリBundle identifierを入力します。

詳細設定タブの認証でAppTypeをNative/Desktopに、App Secret in ClientをNoに設定します。

    if ([SLComposeViewController isAvailableForServiceType:SLServiceTypeFacebook]) {
        ACAccountStore *accountStore = [[ACAccountStore alloc] init];
        ACAccountType *accountType = [accountStore accountTypeWithAccountTypeIdentifier:ACAccountTypeIdentifierFacebook];
        NSDictionary *options = [NSDictionary dictionaryWithObjectsAndKeys:
                                 @"2768xxxxxxxxxxx", ACFacebookAppIdKey,
                                 [NSArray arrayWithObjects:@"public_actions", @"publish_stream", @"offline_access", nil], ACFacebookPermissionsKey,
                                 ACFacebookAudienceOnlyMe, ACFacebookAudienceKey,
                                 nil];
        [accountStore
         requestAccessToAccountsWithType:accountType
         options:options
         completion:^(BOOL granted, NSError *error) {
             NSArray *accountArray = [accountStore accountsWithAccountType:accountType];
             for (ACAccount *account in accountArray) {

                 NSString *urlString = [NSString stringWithFormat:@"https://graph.facebook.com/%@/feed", [[account valueForKey:@"properties"] valueForKey:@"uid"]] ;
                 NSURL *url = [NSURL URLWithString:urlString];
                 NSDictionary *params = [NSDictionary dictionaryWithObject:@"SLRequest post test." forKey:@"message"];
                 SLRequest *request = [SLRequest requestForServiceType:SLServiceTypeFacebook
                                                         requestMethod:SLRequestMethodPOST
                                                                   URL:url
                                                            parameters:params];
                 [request setAccount:account];
                 [request performRequestWithHandler:^(NSData *responseData, NSHTTPURLResponse *urlResponse, NSError *error) {
                     NSLog(@"responseData=%@", [[NSString alloc] initWithData:responseData encoding:NSUTF8StringEncoding]);
                 }];
             }
         }];
    }
optionsで、ACFacebookAppIdKey(Facebookアプリで登録した時のApp ID)、ACFacebookPermissionsKey(アプリのアクセス権限)、ACFacebookAudienceKey(投稿の公開範囲)でACFacebookAudienceEveryone/ACFacebookAudienceFriends/ACFacebookAudienceOnlyMeのいづれかを設定します。
FacebookのPermissionsの詳細についてはこちら ⇨ http://developers.facebook.com/docs/authentication/permissions/
投稿だけであれば、「public_actions」「publish_stream」「offline_access」を設定しておけば十分かと思います。
サンプルコード
サンプルをgithubにアップしました。
https://github.com/hmori/SocialPostSample
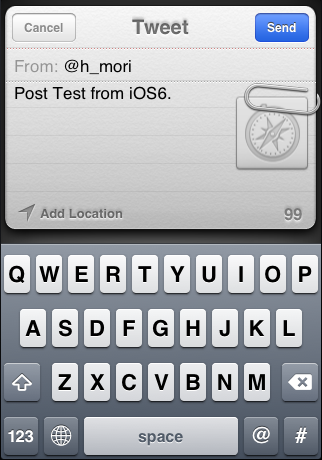
Show accountはiOSで認証したACAccountのオブジェクトを表示します。SLComposeViewControllerの各ボタンはiOS標準の投稿画面がポップアップします。SLRequestの各ボタンは固定メッセージを直接投稿しますのでご注意ください。
また、実装してみて1つ疑問が湧いたのですが、ACAccountStoreとSLRequestを利用すればTwitter、Weiboについてはアプリ登録なし(appkey不要)で任意のメッセージを投稿できてしまいます。おそらくどのソーシャルメディアもスパム対策としてアプリから投稿する場合にユーザーが意図しない内容を勝手に投稿してはいけない規約が存在します。スパムアプリと認定された場合はそのappkeyでのAPIに制限が掛けることが可能だと思いますが、SLRequestとACAccountでの実装はappkeyなしでも投稿が可能な仕組みです。AppStoreのアプリ配布制限もあくまでApple側の管理下なのでTwitter、Weibo側からの要求がなければスパムアプリを止めることができないように思います。いづれTwitter、Weiboのカスタム実装でFacebookのようにappkeyやpermissionが必要となる日がくるかもしれません。
スクロール追跡バナーを作ってみた
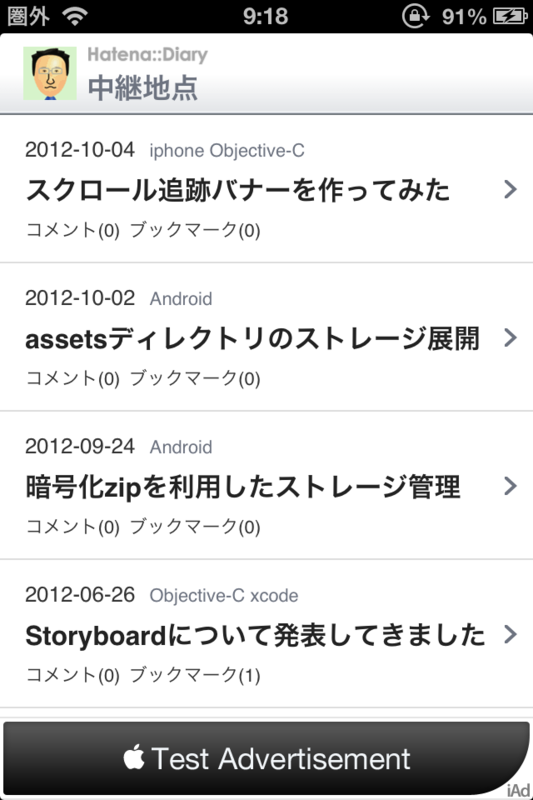
スマホに最適化されたWebサイトでよく見かけるスクロールについてくるあのバナーを、あえてネイティブで実装してみました。あくまで技術的なネタであってわざわざこういった実装をする目的はアレなので実際にAppStoreの審査でどうなるかは不明です。
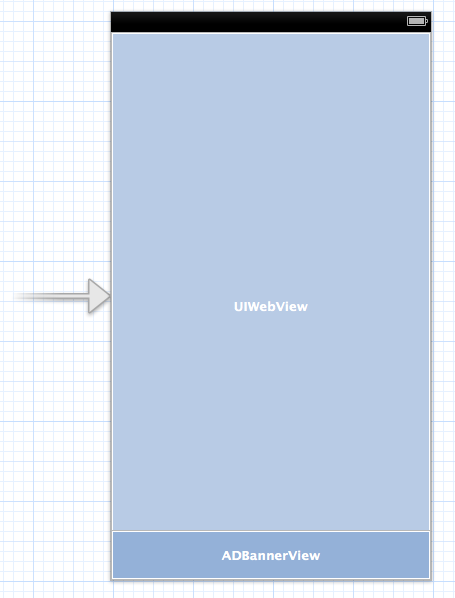
方法としては、UIWebView(UIScrollView)とバナーのViewはそれぞれ独立させて配置し、スクロールをトラッキングするUIScrollViewDelegate#scrollViewDidScroll:(UIScrollView) で、scrollViewのoffsetを利用し、バナーのViewのoffsetを調整するようにします。
バナーを画面スクロールに追従させる
UIWebViewは全画面にADBannerViewは下部に配置します。
UIWebViewのscrollViewのdelegateを設定しハンドリングし、scrollViewのcontentOffset.yを調整するようにします。
これでUIWebViewのトラッキングについてbannerViewが移動するようになります。
self.webView.scrollView.delegate = self;
- (void)scrollViewDidScroll:(UIScrollView *)scrollView {
    CGRect screen = [[UIScreen mainScreen] applicationFrame];
    CGFloat newOffsetY = screen.size.height - self.bannerView.frame.size.height - scrollView.contentOffset.y;
    self.bannerView.frame = CGRectMake(self.bannerView.frame.origin.x,
                                           newOffsetY,
                                           self.bannerView.frame.size.width,
                                           self.bannerView.frame.size.height);
}
この実装だけでは張り付いた状態のままなので、スクロールが止まった時点で初期位置に戻すようにします。
スクロール終了時に画面下部に移動させる
UIScrollViewDelegateのドラッグ終了、スクロール慣性の停止、タイトルバータップによるTOP移動アニメーション終了が分かれているので、それぞれで検知します。
- (void)scrollViewDidEndDragging:(UIScrollView *)scrollView willDecelerate:(BOOL)decelerate {
     //ドラッグ終了
     if(!decelerate) {
        [self resetOffsetBannerView:scrollView];
     }
}

- (void)scrollViewDidEndDecelerating:(UIScrollView *)scrollView {
     //スクロール慣性停止
    [self resetOffsetBannerView:scrollView];
}

- (void)scrollViewDidScrollToTop:(UIScrollView *)scrollView {
     //TOP移動アニメーション終了
    [self resetOffsetBannerView:scrollView];
}
scrollViewDidEndDragging: willDecelerate: のdecelerateは慣性スクロールが働いているかのフラグです。ここでは慣性が働いていない時(decelerate=NO)に画面が止まったと判断して処理します。
これでWebサイトに乗っかってるかのようなあのいやらしいバナーの動きを再現できます(^^
サンプルコード
サンプルコードをgithubにアップしました。
https://github.com/hmori/AdChaseSample
scrollViewDidScroll: で移動するcontentOffsetの方向を判定すると、追跡するバナーの方向を上方向だけに限定することも可能ですが、ちょっとやり過ぎかもしれません。
- (void)scrollViewDidScroll:(UIScrollView *)scrollView {
    if (self.adjustOffset.y < scrollView.contentOffset.y) {
        CGFloat newOffsetY = [self offsetYBannerView] + self.adjustOffset.y - scrollView.contentOffset.y;
        self.bannerView.frame = CGRectMake(self.bannerView.frame.origin.x,
                                           newOffsetY,
                                           self.bannerView.frame.size.width,
                                           self.bannerView.frame.size.height);
    }
}
この方法は、標準アプリの「メモ」のような画面の上部にUISearchViewを配置しスクロールに合わせて上に隠れる仕掛けと多分同じです。
assetsディレクトリのストレージ展開
リソースとして管理したくないデータ(常時メモリ展開したくないデータ)をassetsにディレクトリ構成で配置して、起動時にストレージに丸ごとディレクトリコピーを実装してみましたが、AssetManagerの制約、ファイルサイズ制限等で色々と難儀したのでメモします。
AssetManagerのディレクトリ判定
assetsフォルダ配置内は静的に配置を目的としているためか、抽象表現であるFileが扱えない仕様となっています。問題としてはlist()で取得したパスのディレクトリ・ファイルを判別する手段がありません。
AssetManagerの主要メソッド
| String[] list(String path) | 引数のパスに含まれる全ての子のパスを取得する |
| InputStream open(String filename, int accessMode) | 引数のパスのInputStreamを取得する |
| AssetFileDescriptor openFD(String filename) | 引数のパスのFileDescriptorを取得する |
| XmlResourceParser openXmlResourceParser(String filename) | 引数のパスのXmlParserを取得する |
代替案として、パスをlist()で取得可能またはそのパスをopen不可だった場合はディレクトリと判断するようにします。(※空ディレクトリのパスの場合、open()にてFileNotFoundExceptionが発生します)
     private boolean isDirectory(final String path) {
          boolean isDirectory = false;
          try {
               if (assetManager.list(path).length > 0){ //子が含まれる場合はディレクトリ
                    isDirectory = true;
               } else {
                    // オープン可能かチェック
                    assetManager.open(path);
               }
          } catch (FileNotFoundException fnfe) {
               isDirectory = true;
          }
          return isDirectory;
     }
assetsからStorageへのディレクトリコピー
ディレクトリの全コピーなのでcopyのロジックは再帰メソッドで実装しますが、AssetManagerは
Fileオブジェクトが扱えないのでassetsのpathで扱うことになります。
     private void copyFiles(final String parentPath, final String filename, final File toDir) {

          String assetpath = (parentPath != null ? parentPath + File.separator + filename : filename);
          if (isDirectory(assetpath)) { //ディレクトリ判定
               if (!toDir.exists()) {
                    //出力先のディレクトリ作成
                    toDir.mkdirs();
               }
               for (String child : assetManager.list(assetpath)) {
                    //再帰呼出
                    copyFiles(assetpath, child, new File(toDir, child));
               }
          } else {
               //バイナリコピー
               copyData(assetManager.open(assetpath), new FileOutputStream(new File(toDir.getParentFile(), filename)));
          }
     }
非圧縮ファイルサイズ制限
Android OSではUNCOMPRESS_DATA_MAX(約1MB)で指定された以上のファイルが扱えない仕様となっています。
http://pentan.info/android/app/assets_data_max.html
1MBを超える可能性のあるファイルについては圧縮してassetに配置する必要があります。
zip解凍にはZipInputStreamを利用して展開します。
     private void unzip(InputStream is, File toDir) {
          ZipInputStream zis = null;
          try {
               zis = new ZipInputStream(is);
               ZipEntry entry;
               while ((entry = zis.getNextEntry()) != null) {
                    String entryFilePath = entry.getName().replace('\\', File.separatorChar);
                    File outFile = new File(toDir, entryFilePath);
                    if (entry.isDirectory()) {
                         outFile.mkdirs();
                    } else {
                         BufferedOutputStream bos = null;
                         try {
                              bos = new BufferedOutputStream(new FileOutputStream(outFile));
                              byte[] buffer = new byte[1024];
                              int len = 0;
                              while ( (len = is.read(buffer, 0, buffer.length)) > 0) {
                                   bos.write(buffer, 0, len);
                              }
                              bos.flush();
                         } finally {
                              if (bos != null) { try { bos.close(); } catch (IOException ioe) {} }
                         }
                         zis.closeEntry();
                    }
               }
          } finally {
               if (zis != null) { try { zis.close(); } catch (IOException ioe) {} }
          }
     }
サンプルコード
今回使用したサンプルコードをgithubにアップしました。
https://github.com/hmori/AssetTest
「expand data」ボタンで "assets/data" を内部ストレージ"/data/data/{パッケージ名}/app_data"に展開します。展開中、zipファイルの場合はzip展開してコピーするようにしています。StorageManagerコンストラクタの第3引数をtrueにするとSDカード(/mnt/sdcard/{パッケージ名}/data)へ展開します。
サンプルではassetsにディレクトリ構成で配置して実装していますが、実際にはディレクトリ毎zip圧縮して展開した方がシンプルになると思います。
